
This article was updated in June 17, 2025 with new products and information by Mark S. Taylor
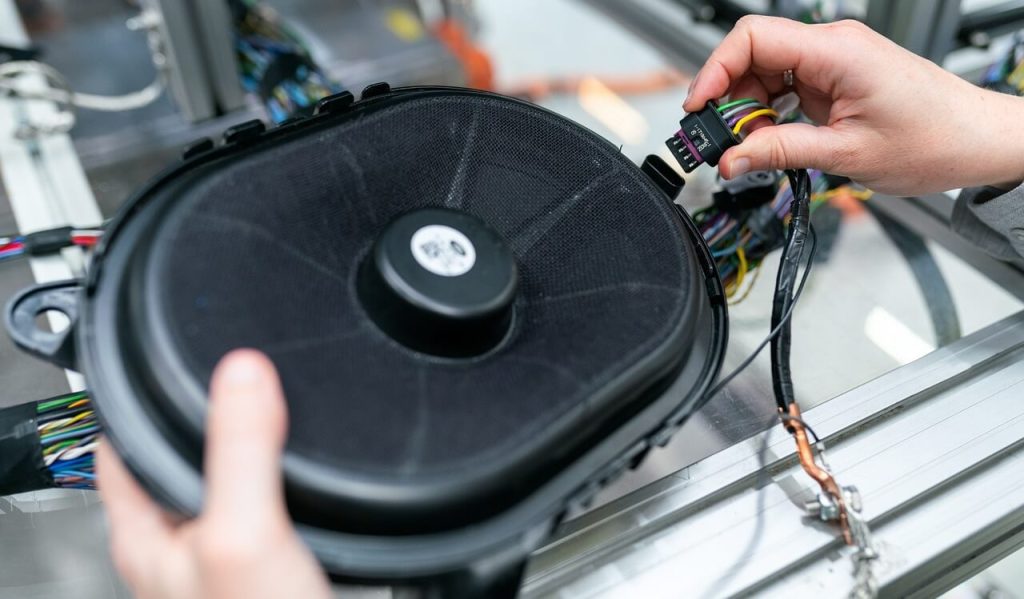
I used to hate long drives. Why? My car’s factory speakers sounded like they were stuck in a fish tank. One day, I had enough — I bought a set of component speakers and taught myself how to install car speakers . Spoiler: it wasn’t magic. Just patience, a few tools, and some good YouTube tutorials.
Upgrading your sound doesn’t have to be hard. But doing it right? That makes all the difference. Whether you’re adding coaxial speakers to your front doors or dropping a subwoofer in the trunk, this guide will show you how to do it step by step.
I’ll share what I wish I knew before my first install — from basic wiring to choosing the right amp and avoiding big mistakes.
Contents
Why You Should Upgrade Your Car Speakers
When I upgraded my car speakers, it felt like I was hearing my music for the first time. The difference was huge! If you’re tired of the flat, lifeless sound from your factory speakers, upgrading can completely change the way you experience music on the road. Upgrading your car speakers is one of the easiest and most effective ways to improve sound quality without spending a ton of money.
Choosing between component speakers and coaxial speakers can be tricky. Component speakers are made up of separate parts, like a woofer and tweeter, for better sound. They give you a richer, clearer audio experience. Coaxial speakers are all-in-one, making them simpler to install and more budget-friendly. If you just want a simple upgrade, coaxial might be the right choice. But if you’re looking for top-notch sound, go for components.
Don’t forget the woofers and subwoofers! Adding a subwoofer will boost your bass and make your music come alive. It’s a game changer if you love music with a deep beat. It’s like the difference between hearing a song and feeling it.
Installing car speakers might sound hard, but it’s actually doable for most DIYers. You just need the right tools, some patience, and the right instructions. By taking your time and following a step-by-step guide, you can save money and enjoy better sound at the same time.
So, if you want clearer sound, deeper bass, or just a better overall experience, upgrading your speakers is a smart move. Trust me, once you hear the difference, you won’t go back.

What You’ll Need to Get Started — No Mystery Parts, I Promise
I used to think upgrading my car speakers would mean buying some fancy tool I’d never use again. Turns out, you don’t need much. Most of what you need is probably already in your garage — screwdrivers, wire strippers, electrical tape, and a few screws. If not, they’re super cheap and easy to find at any hardware store.
You’ll also want a car speaker installation kit , which usually includes a wiring harness and adapters. These make life way easier by matching your new speakers to your car’s existing system. I skipped this once and regretted it — trust me, spend the $10 and save yourself the headache.
For safety, gloves and eye protection are a must when pulling off door panels or working near sharp edges. Car interiors can be rough on hands, and one slip with a screwdriver can ruin your whole day.
When picking speakers , start simple. For rear fill, I like basic coaxial models — affordable and sound great. For front doors, component speakers give that concert feel. And if you love bass, grab a small subwoofer — even a budget one makes a big difference.
And don’t forget: good speaker wires , connectors, and maybe some sound-deadening material . The better your wires, the cleaner your sound. Sound deadening helps reduce vibration noise — I added it to my doors and noticed a real upgrade in clarity.
Understanding Car Audio Components — Like Knowing Your Band Members
Think of your car audio system like a band. You’ve got singers, guitarists, and a drummer — each doing their own thing to make the music whole. Same with speakers: different parts do different jobs, and knowing what they are makes installing car speakers way easier — and more fun.
Let’s start with placement. I used to just throw speakers wherever they fit. Then I learned: front door speakers are your main vocalists — they carry most of the sound you hear. The trunk subwoofer , on the other hand, is your drummer — deep, powerful, and felt more than heard. Putting a sub in the trunk gives you clean bass without taking up front space.
Now for types. Coaxial speakers are like all-in-one combo packs — tweeter and woofer in one unit. Great for rear fill or budget builds. Component speakers split them out, so highs and lows hit clearer — perfect for front doors if you want concert-level detail. And subwoofers ? They handle only the deepest bass notes — no mids, no highs, just punchy low-end.
One part people often skip? The crossover . This little box acts like a traffic cop — sending highs to the tweeter, lows to the woofer. Without it, your speakers try to do too much and end up sounding muddy. I didn’t use one at first. Big mistake. Once I added it, my sound went from “meh” to “wow.”
Step-by-Step Guide to Installing Car Speakers
Installing new speakers in your car is easier than it seems, especially when you follow the right steps. Here’s a simple guide to help you get the job done. Trust me, once you do it, you’ll feel like a pro!
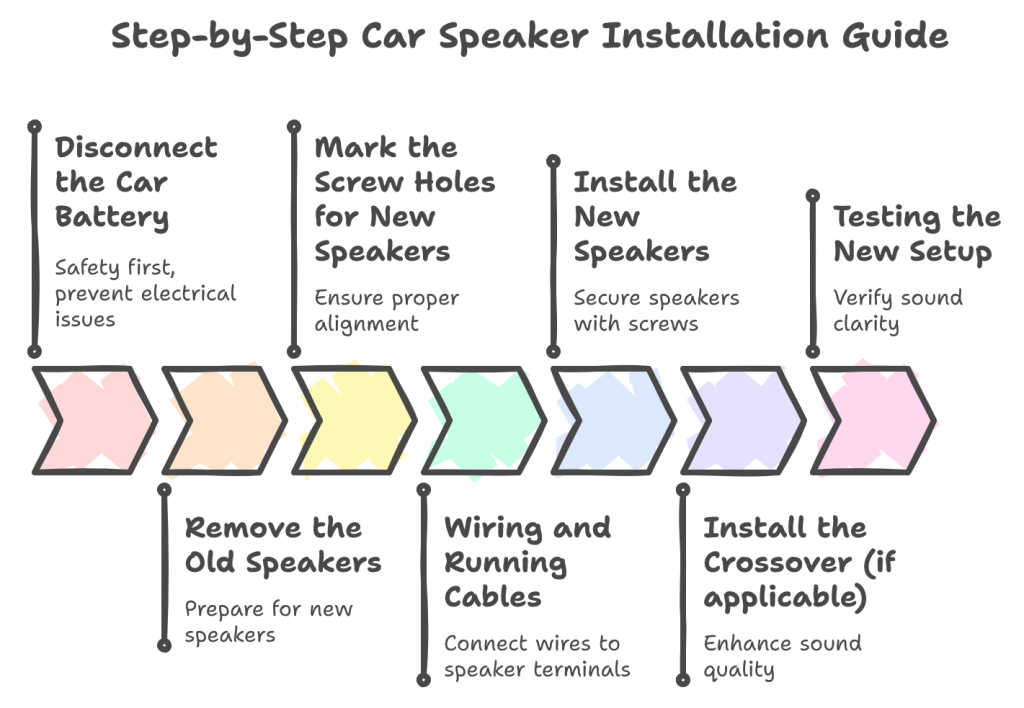
Step 1: Disconnect the Car Battery
Before doing anything, safety comes first! Disconnecting the car battery is a must to avoid any electrical issues. To do this, open the hood and locate your car’s battery. You’ll usually find it near the front of the engine bay. Use a wrench to loosen the negative terminal (the one marked with a minus sign) and remove it. This simple step prevents any accidents when working with wires and speakers.
Step 2: Remove the Old Speakers
Next, it’s time to take out your old speakers. Start by removing the screws holding the speaker grille in place. Be careful not to damage the surrounding interior. Once you’ve got the screws out, gently lift the speaker from its place. You may need to disconnect some wires, but be sure to note where they connect, as you’ll be doing this again with the new speakers.
Step 3: Mark the Screw Holes for New Speakers
With the old speaker out, it’s time to install the new one. Hold the new speaker in place and mark the screw holes on the door or panel. This is crucial for getting the right alignment. If you’re replacing door speakers, make sure they’re placed in a spot that allows the sound to travel freely into the cabin.
Step 4: Wiring and Running Cables
Now comes the wiring part. You’ll need to connect the wires to the new speaker. Start by matching the wires from your car to the speaker terminals, ensuring the polarity is correct. Here’s a basic wiring diagram to help:
Red wire to the positive terminal (+)
Black wire to the negative terminal (-)
If you’re adding an amplifier, make sure to run the wires from the amp to the speaker. Also, remember to hide the wires neatly along the edges of the door or panel to keep everything clean and avoid any damage.
Step 5: Install the New Speakers
Now that your wiring is ready, it’s time to install the new speakers. Carefully place the speaker into the marked holes and secure it with screws. If you’re installing woofers, coaxial speakers, or even subwoofers, make sure they’re seated properly for a snug fit. Tighten the screws, but don’t overdo it—just enough to keep the speaker in place.
Step 6: Install the Crossover (if applicable)
If you’re using component speakers, you’ll also need to install a crossover. This small device ensures that the right frequencies are sent to the right speakers. Mount the crossover in a dry, secure location near the speakers, and connect the wiring according to the diagram provided. This step might seem a little extra, but it makes a huge difference in the quality of sound.
Step 7: Testing the New Setup
Before you close everything up, it’s time to test the speakers. Reconnect the car battery, turn on the stereo, and check if the sound comes through clearly. Listen for any odd noises or sound issues. If everything sounds good, you’re ready to finish the installation. Just be sure to secure all panels and screw everything back into place.
Wiring Your Car Speakers to an Amp — Like Giving Your Music a Power-Up
Hooking up my first amp felt like giving my car stereo a shot of adrenaline. Suddenly, everything was louder, cleaner, and way more dynamic. But it wasn’t magic — just some careful wiring and matching parts right. Let me walk you through how I did it, step by step, without frying anything.
🔧 What You’ll Need Before You Start
You’ll need speaker wire (16- or 18-gauge works for most), crimp connectors or solder, zip ties, and maybe a fuse holder for the power line. And of course, your amp. I picked a Class D amp — they’re the most common for car use because they’re efficient and don’t drain your battery.
📐 How to Wire Car Speakers to an Amp (Simple Diagram)
Think of your amp like a traffic cop — it tells the power where to go. Run a thick power wire from your battery to the amp (with an inline fuse close to the battery). Then ground the amp to the chassis. The remote turn-on wire connects to your stereo so the amp powers on when you do.
From there, run speaker wires from the amp outputs to each speaker. Positive (+) to positive, negative (−) to negative. If you’re running two speakers per channel (like both front doors off one side of the amp), wire them in parallel — but make sure your amp can handle the impedance.
I always draw a quick diagram before I start — even if it’s just on a napkin. Keeps me from mixing up wires later.
⚖️ Key Things to Check When Adding an Amp
Match your amp to your speakers. If your speakers are 4 ohms, your amp should support that. If not, you’ll get distortion or worse — blow something out. Also check RMS wattage: don’t push a 50-watt speaker with a 100-watt amp. Trust me, I learned this the hard way.
Once wired, adjust the gain and crossover settings. Start low, play a test track, and slowly turn up until it sounds clean. Too loud and you’ll clip the signal — which sounds bad and hurts your gear.
🛠️ Mounting the Amp the Right Way
Find a solid spot — usually under a seat or in the trunk near the sub. Make sure it’s secure and has good airflow. Use bolts or brackets, not just tape or zip ties. Vibration is the enemy of electronics — keep it tight.
Common Issues & Troubleshooting — Don’t Panic, Here’s What Went Wrong
Even after dozens of installs, I still mess things up sometimes. Car audio is like cooking — even pros burn the toast once in a while. The good news? Most problems have simple fixes. Let me walk you through the most common issues I’ve run into — and how I fixed them fast.
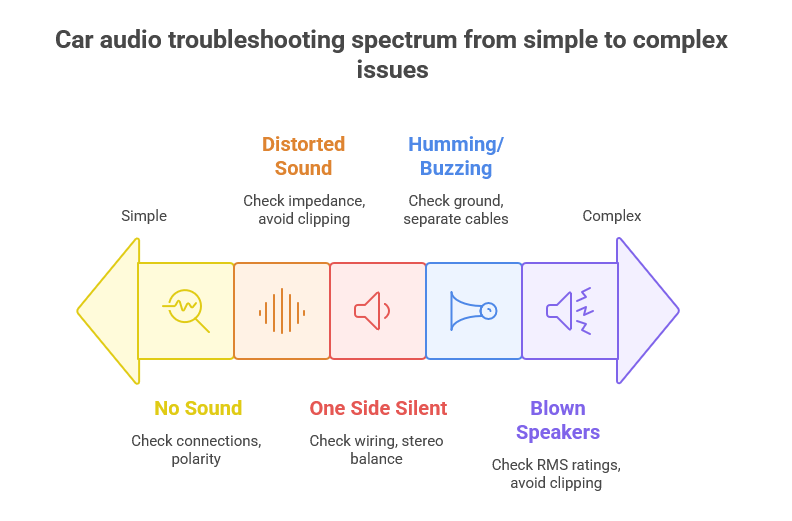
🔇 No Sound? Check Wiring and Polarity First
This one hits hard when you’re excited to hear your new speakers. If nothing plays, start simple: Did you plug everything in? Is the amp powered on? Check both ends of each wire — I’ve had a loose speaker wire kill the whole system before. And make sure polarity matches: positive (+) to positive, negative (−) to negative. Flip them, and you could end up with weak or no sound.
🎵 Distorted Sound? Your Amp Might Be Pushing Too Hard
If your music sounds raspy or broken, check speaker impedance. My first setup had mismatched gear — 2-ohm speakers on a 4-ohm amp — and it sounded terrible. Also, watch for clipping. That happens when you crank a small amp past its limits. It’s loud, but it hurts your speakers. Think of it like yelling too long — eventually, your voice gives out.
🎧 One Side Not Working? Look at the Harness or Stereo Settings
It’s frustrating when only one side plays. Start by switching left and right wires at the amp — if the problem moves, it’s not the speaker. If it stays, check the head unit settings. I once had my balance knob accidentally shifted all the way to one side — wasted an hour chasing a phantom issue.
🤫 Humming or Buzzing? You’ve Got a Ground Loop or Interference
A constant hum? Odds are, your ground isn’t solid. Make sure the amp’s ground wire connects directly to bare metal on the car body — paint and rust don’t count. Also, keep power and signal cables separate. I once ran RCA cables next to the power line — buzz city. Move them apart, and the noise vanished.
💥 Blown Speakers? Could Be a Power Problem
If your speakers died after cranking the volume, they might be blown — especially if they pop and go silent. More often than not, it’s because the amp was too strong or was clipping. I learned this the hard way with a subwoofer that didn’t match my amp. Always double-check RMS ratings before powering up.
How to Install Speakers in Non-Standard Locations — Trunk, Wall, or Wherever You Want Bass
I once tried putting speakers through the wall into my garage — bad idea. They sounded muffled, got wet from rain, and died in a month. But not all non-traditional installs are doomed. I’ve had great luck with trunk setups, and even did one behind a false panel in my hatchback. Here’s what I learned — so you don’t have to learn the hard way.
🎛️ Installing Speakers in the Trunk — Do It Right
If you want big sound without taking up front space, the trunk is a solid spot — especially for subwoofers. Just make sure they’re in a sealed or ported enclosure for best performance. I mounted mine on a board across the back and added foam around the edges to cut vibration noise. Big difference in clarity.
Run wires through the firewall or under the carpet — use existing holes if you can. Don’t forget to add a fuse near the battery. I skipped that once. Let’s just say it ended with a smoky smell and a fast trip to AutoZone.
🧱 Mounting Through Walls or Panels — What to Watch For
Some people mount speakers in weird places — like behind seats, under floors, or through walls. If you’re thinking about this, test fit first. Make sure there’s enough clearance and airflow. And avoid placing them where they’ll vibrate the whole car — trust me, bass in the wrong spot feels like an earthquake.
Also, think about wiring. Run speaker wires through rubber grommets or existing openings to avoid pinching or chafing. I once zip-tied a wire too tight and it snapped after a few bumps. Painful fix.
🔊 Sound Quality Tips for Odd Installations
Wherever you put your speakers, aim for clear path to your ears — or at least toward open space. If they’re facing carpet or upholstery, expect some muffling. I added small tweeters near the rear window when I moved my midrange drivers to the back. Balanced out the sound and kept things crisp.
Upgrading Your Car Audio System — It’s Not Just About the Speakers Anymore
I used to think better speakers were all I needed for great sound. Then I realized my car was still rattling, my highs were dull, and my bass felt weak no matter how loud I cranked it. That’s when I learned: upgrading your whole system — not just the speakers — makes the real difference. Here’s what I did, and how you can do it too.
🎵 Don’t Skip the Tweeters — They Bring Out the Detail
You can have the best woofers in the world, but without good tweeters, your music will always feel flat. Highs are what make vocals clear and instruments sparkle. I upgraded to silk dome tweeters and mounted them on the dash — instantly noticed more clarity, especially with acoustic or live tracks.
If your setup doesn’t include tweeters, consider adding component speakers. They separate highs and lows so each gets its own dedicated driver — like giving your ears front-row seats at every concert.
🔊 Amp It Up — A Little Power Goes a Long Way
Even the best speakers won’t shine if they’re underpowered. I added a small Class D amp for my front speakers and a mono block for my subwoofer. Suddenly, everything had more depth and punch. Think of an amp like a better pair of lungs — it gives your speakers the air they need to really sing.
And don’t worry — you don’t need to go crazy with watts. Just match your amp to your speakers’ RMS rating, and you’ll be golden.
🧱 Sound Deadening — The Secret to Cleaner Sound
This one surprised me. I thought sound deadening was just for show cars. Turns out, it actually makes your music sound better. Road noise, wind, and panel vibrations mess with your listening experience more than you realize.
I added a layer behind my door panels and under the rear deck. Result? Less noise, tighter bass, and clearer mids. Like night and day.
🧩 Upgrade Smart — Balance Is Key
You don’t need to buy the most expensive gear — just make sure everything works together. Match your tweeters, midrange speakers, subs, and amp so they complement each other. Think of it like cooking — even the best steak tastes bad with the wrong seasoning.
FAQs: Common Questions About Car Speaker Installation
Q1: Do I need an adapter to install new speakers in my car?
Sometimes you need an adapter, especially if the new speakers don’t match your car’s existing wiring. An adapter helps connect your new speakers without cutting or splicing the wires, making the job easier and cleaner.
Q2: How do I install speakers without a harness?
If you don’t have a harness, you can still install the speakers by connecting the wires directly. Make sure to match the positive and negative terminals, and use crimp connectors or soldering to secure the connections.
Q3: Can I install car speakers in the trunk or wall?
Yes! You can install speakers in the trunk or through the wall, but it takes a bit more planning. Just make sure to mount them securely, direct the sound toward the cabin, and properly route the wires to get the best sound.
Q4: What’s the best way to install speakers in the door of my car?
To install speakers in the door, you’ll need to remove the door panel first. Once that’s done, mark where the screws go, secure the speakers, and carefully route the wires. Just make sure everything is tight and neat!
Q5: Should I always add an amp when upgrading speakers?
Not always. If your new speakers are efficient, your car’s stereo might provide enough power. However, adding an amp can help if you want louder sound or better bass, especially for subwoofers or high-power speakers.
My Final Thoughts on How to Install Car Speakers — Enjoy the Ride, Literally
If you’re someone who loves music and wants better sound without breaking the bank, learning how to install car speakers is one of the best upgrades you can make. But if wiring feels overwhelming or your car has a complex system, don’t be afraid to get help — some setups are just trickier than others.
I used to think only pros could get great car audio. Now I know: with patience and the right steps, anyone can do it. Whether you’re adding a subwoofer, upgrading your doors, or just cleaning up the wiring, take pride in what you’ve built — because it sounds amazing.