
This article was updated in October 14, 2024 with new products and information by Mark S. Taylor
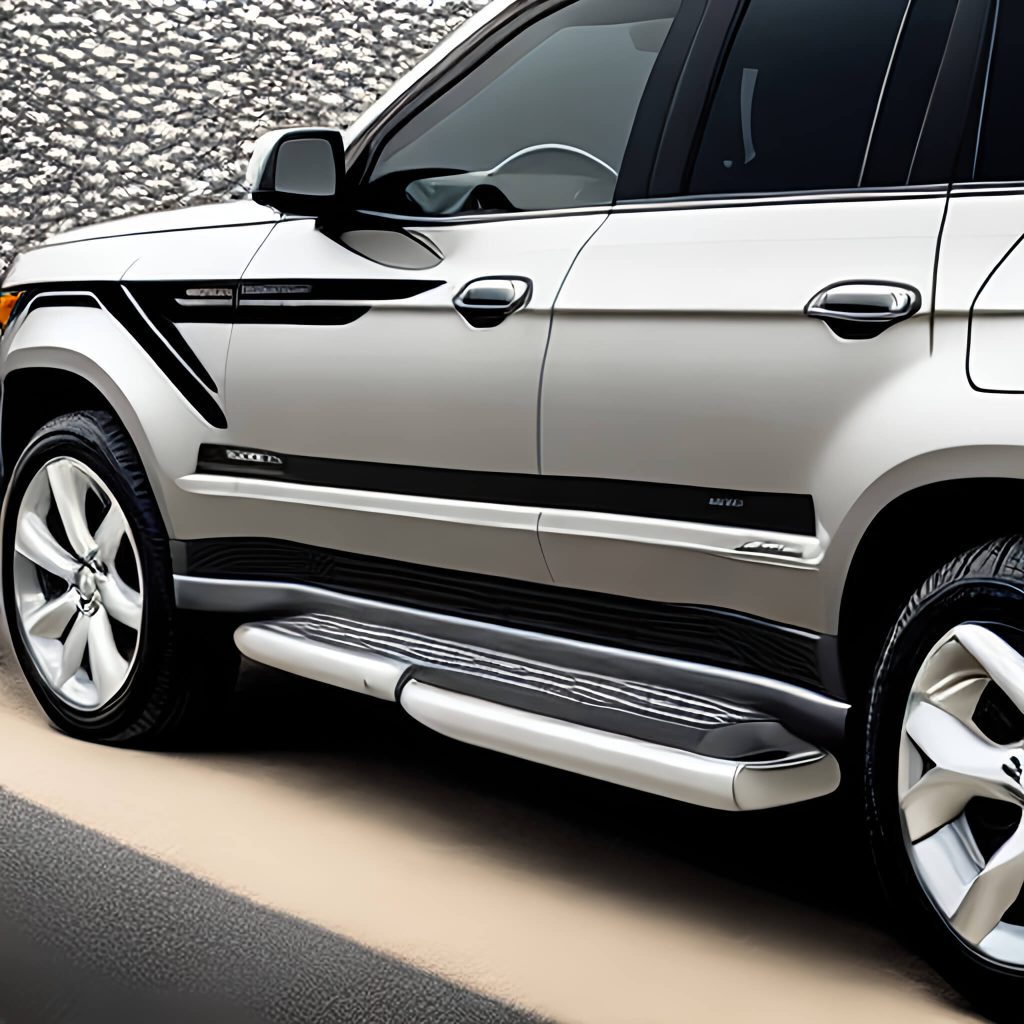
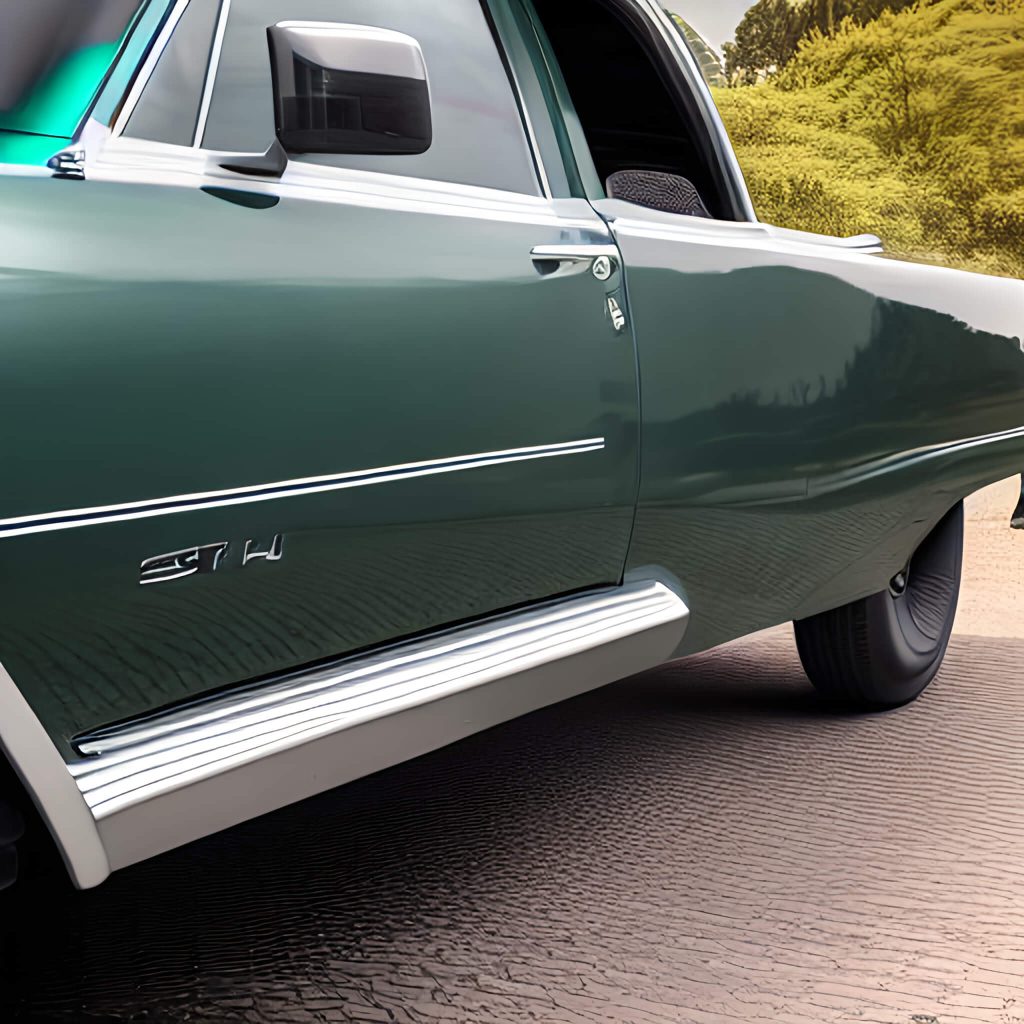
Westin running boards are a popular accessory that enhances the functionality and appearance of vehicles. These running boards provide an additional step to make it easier to enter and exit the vehicle, while also protecting the vehicle’s exterior. In this article, we will guide you through the installation process of Westin running boards, ensuring a secure and proper fit.
Contents
Understanding Westin Running Boards
Westin running boards are designed to be vehicle-specific, meaning they are engineered to fit particular makes and models. These running boards come with brackets and hardware necessary for installation. Before starting the installation process, ensure that you have purchased the correct running boards that are compatible with your vehicle.
To install Westin Running Boards, first align the brackets on your vehicle’s body, then secure the boards onto the brackets. Follow the provided instruction manual for a seamless installation process.
Westin Running Boards offer a perfect blend of style and functionality to your vehicle, making access in and out of the cabin easier. These accessories not only enhance the exterior aesthetics but also serve as a step to assist with vehicle entry and exit.
With a variety of styles and finishes available, they cater to a wide range of preferences and are designed to fit specific vehicle models for a custom look. Installation is typically straightforward, requiring only basic tools and some mechanical aptitude. Ensuring your running boards are properly installed can greatly improve their performance and durability, giving you peace of mind and a safer stepping surface.
Tools Needed
Are you ready to upgrade your vehicle with Westin running boards? Great choice! They provide a sturdy step and enhance your vehicle’s look. Before starting, gather the right tools. A smooth installation process depends on it. Let’s dive into the essentials for installing your new running boards.
Basic Tools
Installing Westin running boards is straightforward with the right tools. Begin with these basics:
- Socket Wrench Set: Vital for tightening bolts and nuts.
- Screwdrivers: Both flathead and Phillips head are needed.
- Drill: Essential for making pilot holes if your vehicle isn’t pre-drilled.
- Drill Bits: Various sizes to match the drilling requirements.
- Measuring Tape: For precise placement of the running boards.
- Torque Wrench: Ensures bolts are tightened to the manufacturer’s specifications.
- Protective Eyewear: Safety first! Always protect your eyes when drilling or cutting.
Here’s a table that summarizes the tools and their uses:
| Tool | Use |
|---|---|
| Socket Wrench Set | Tightening bolts and nuts |
| Screwdrivers | Securing screws |
| Drill | Making pilot holes |
| Drill Bits | Matching hole sizes |
| Measuring Tape | Ensuring proper alignment |
| Torque Wrench | Applying correct bolt tension |
| Protective Eyewear | Eye protection |
With these tools, you’re set to start the installation. Check your vehicle’s manual for any specific requirements. Now, let’s look at some optional tools that might make the job even easier.
Optional Tools
While the basics cover most needs, certain tools can simplify the installation. Consider these optional additions:
- Allen Wrench Set: Some running boards use Allen bolts.
- Trim Panel Removal Tools: Non-marring tools for removing vehicle trim without damage.
- Creeper: Makes it comfortable to work under the vehicle.
- Work Light: For clear visibility in dim areas.
- Magnetic Tray: Keeps small metal parts from getting lost.
- Jack and Jack Stands: If extra clearance is needed.
- Gloves: Protect your hands during the install.
Here’s a helpful table for the optional tools:
| Tool | Use |
|---|---|
| Allen Wrench Set | Working with Allen bolts |
| Trim Panel Removal Tools | Safe trim removal |
| Creeper | Comfort under the car |
| Work Light | Improving visibility |
| Magnetic Tray | Holding small parts |
| Jack and Jack Stands | Elevating the vehicle |
| Gloves | Hand protection |
While these tools are not mandatory, they can enhance safety and efficiency. Assess your needs and decide which ones will serve you best. With your tools ready, you’re all set to install your Westin running boards!
Preparation Steps
Before you embark on installing Westin Running Boards, it’s crucial to take some preparation steps. These steps ensure a smooth installation process and help prevent any damage to your vehicle. Let’s walk through the essential prep work needed to get your car ready for its new addition.
Choose Location
Finding the right spot to install your running boards is the first step. Look for a level, well-lit area that gives you ample space to work around your vehicle. A garage or driveway is ideal. Make sure the ground is flat to prevent any accidents or uneven installation. Here’s what to consider:
- Space: Ensure there’s enough room to open the car doors fully and lay out all your tools and parts.
- Lighting: Good visibility is important, so choose a place with plenty of light.
- Safety: A quiet, traffic-free zone prevents interruptions and hazards.
| Requirement | Details |
|---|---|
| Area Size | Enough to walk around the vehicle comfortably |
| Surface | Level and stable |
| Environment | Indoor preferred to avoid weather issues |
Once you’ve chosen the perfect location, it’s time to prep the site. Clear the area of any debris or tools that could get in the way. A clean workspace helps you stay organized and safe.
Clean Vehicle Surface
With the location set, focus on prepping your vehicle’s surface. A clean surface ensures the running boards adhere properly and look their best. Follow these steps:
- Wash: Start with a thorough wash of the area where you’ll attach the running boards. Use soap and water to remove all dirt and grime.
- Dry: After washing, dry the surface completely with a clean cloth. Any moisture can cause issues during installation.
- Inspect: Look for any rust or damage that could affect the installation. Address these issues before proceeding.
Once the surface is clean, take extra care with these tips:
- Use a degreaser: An automotive degreaser removes any oil or wax that might prevent the running boards from sticking.
- Handle with care: Avoid touching the cleaned areas with your hands to prevent oils from transferring back onto the surface.
Properly cleaning the vehicle not only helps with installation but also protects your car’s paint. A little effort here goes a long way in ensuring a successful addition of your new Westin Running Boards.
How to Install Westin Running Boards: Step-by-Step Guide
Installing Westin running boards may seem like a complex task, but with the right tools and instructions, it can be a straightforward process. Follow these steps carefully to ensure a successful installation:
Step 1: Gather the Required Tools
Before you begin the installation, gather the following tools:
- Socket set
- Wrench
- Torque wrench
- Drill
- Drill bits
- Measuring tape
- Screwdriver
- Safety glasses
- Gloves (optional)
Step 2: Prepare for Installation
- Measure and Mark: Measure and mark the placement of the running boards along the sides of your vehicle. Ensure the measurements are accurate to ensure a proper fit.
- Clean the Surface: Thoroughly clean the area where the running boards will be installed, removing any dirt, debris, or wax residue. This will ensure a secure and long-lasting attachment.
Step 3: Install Mounting Brackets
- Attach the Mounting Brackets: Begin by attaching the mounting brackets to the vehicle’s frame using the provided hardware. Use the appropriate wrench or socket set to securely tighten the brackets.
- Verify Positioning: Double-check the positioning of the brackets to ensure they align with the marked placement from Step 2. Make any necessary adjustments before proceeding.
Step 4: Attach the Running Boards
- Lift the Running Board: Carefully lift the running board into position, aligning it with the mounting brackets.
- Secure the Running Board: Attach the running board to the mounting brackets using the provided hardware. Use a torque wrench to tighten the screws to the manufacturer’s recommended torque specifications. Be cautious not to overtighten, as it may damage the running board or vehicle’s frame.
Step 5: Finalize the Installation
- Check for Alignment: Once the running boards are securely attached, step back and check their alignment. Ensure they are level and parallel to the ground.
- Test Stability: Apply gentle pressure on the running boards to verify their stability. They should remain firmly in place without any significant movement.
- Repeat the Process: Repeat Steps 3 and 4 for the installation of the remaining running boards, if applicable.
Congratulations! You have successfully installed Westin running boards on your vehicle. Take a moment to appreciate the enhanced functionality and style they bring.
Ensuring Secure Installation
- Double-checking bracket and board alignment: Before fully tightening the bolts or screws, double-check the alignment of the brackets and running boards. Ensure they are straight, level, and properly aligned with the vehicle’s body.
- Tightening all bolts and screws: Once you are satisfied with the alignment, begin tightening all the bolts or screws. Follow the torque specifications provided by Westin to ensure proper tightness.
Testing and Adjusting
- Testing the stability of the running boards: After the installation, test the stability and strength of the running boards by applying gentle pressure. Ensure that they are securely attached and do not wobble or shift.
- Making adjustments if necessary: If you notice any instability or misalignment, carefully inspect the brackets and hardware. Make any necessary adjustments to improve the fit and alignment of the running boards.
Maintenance and Care
- Cleaning the running boards: Regularly clean the running boards to maintain their appearance and prevent the buildup of dirt and debris. Use mild soap and water, and avoid using abrasive cleaners or brushes that could damage the finish.
- Checking for any signs of wear or damage: Periodically inspect the running boards for any signs of wear, loose hardware, or damage. Replace any damaged or worn-out components to ensure the continued functionality and safety of the running boards.
Mounting Bracket Installation
Getting your Westin Running Boards set up is a straightforward process, especially when you start with the mounting bracket installation. This step is crucial as it sets the foundation for a secure and solid fit. Proper installation ensures your running boards will be safe and functional, giving you that boost up into your vehicle with ease. Let’s dive into the essential steps to get those brackets on right!
Locate Mounting Points
Finding the exact spots to attach your brackets is the first task. Your vehicle comes with pre-existing holes underneath, designed for this purpose. Here’s how to find them:
- Start by laying out all the brackets and hardware. Each piece should be labeled.
- Look under the vehicle along the edge of where the running boards will go.
- Identify the mounting holes. You should see several punched out spots or marks.
Some vehicles come with rubber plugs or caps covering these points. If yours does, remove them before proceeding. Here’s a quick checklist to ensure you’ve got it right:
| Step | Action | Check |
|---|---|---|
| 1 | Find hardware kit | Parts labeled and sorted |
| 2 | Inspect undercarriage | Mounting holes located |
| 3 | Remove plugs (if present) | Mounting surface prepped |
With your mounting points located, you’re ready for the next step.
Attach Brackets
Now it’s time to attach those brackets. Follow these instructions for a secure fit:
- Line up the brackets with the mounting points you located.
- Hand-tighten bolts to hold brackets in place initially.
- Ensure they are level before fully tightening.
It’s crucial to get the alignment correct for a stable installation. Check the brackets with a level. If they are not straight, the running boards won’t sit properly. Here’s a step-by-step guide to make sure your brackets are perfect:
| Step | Details | Verification |
|---|---|---|
| 1 | Attach brackets loosely | Brackets in place, not fully tightened |
| 2 | Check alignment | Brackets are level |
| 3 | Tighten bolts | Brackets secured firmly |
With the brackets attached and aligned, you’ve laid a strong foundation. Your running boards are nearly ready to support your step in and out of the vehicle!
Running Board Placement
Installing Westin Running Boards on your vehicle is a great idea. It makes getting in and out easier. The first step is to place the boards correctly. Let’s talk about how to do it right.
Align Boards
First, you need to make sure the running boards line up with your vehicle. Here’s a simple guide:
- Check the kit: Make sure you have all the parts. Each board should have brackets and bolts.
- Read the instructions: Every vehicle is different. The manual shows where to attach the boards.
- Position the boards: Lay them on the ground under the doors. This helps you see where they will go.
Next, use tape to mark where the boards will attach to your vehicle. This step is crucial for precision. Remember, the boards should be parallel to the vehicle’s body.
| Step | Action |
|---|---|
| 1 | Check Kit Contents |
| 2 | Read Instructions |
| 3 | Position Boards |
| 4 | Mark Attachment Points |
Tip: Double-check your alignment before drilling any holes. This prevents mistakes.
Leveling Adjustments
After aligning the boards, you need to adjust them so they are level. Here’s how:
- Attach loosely: Fix the boards to the brackets, but don’t tighten fully. This allows for adjustments.
- Use a level: Place a level on top of the board. Check that it’s flat from front to back and side to side.
- Adjust as needed: If the board isn’t level, adjust the brackets. You might need to move them up or down.
Once the board is level, tighten all the bolts. But do it gradually. First, tighten them a bit. Then go back and tighten each one fully. This method ensures the board stays level.
Remember: Having a friend help can make leveling easier. One can hold the board while the other adjusts and checks the level.
Leveling is key for a secure and visually pleasing installation. Take your time with this step.
Securing The Boards
Installing Westin Running Boards on your vehicle adds style and safety. Now, let’s focus on securing the boards properly. This step is crucial for a safe and sturdy install.
Tightening Bolts
First, gather all your tools and the bolts that came with your kit. You’ll need a wrench or a socket set. Here’s how to tighten the bolts:
- Place the running board against the brackets attached to your vehicle.
- Hand-tighten the bolts to hold the board in place.
- Use your wrench to tighten each bolt. Do not over-tighten.
Remember: Over-tightening can strip the bolts or damage the board.
Check each bolt twice to ensure they’re snug. A loose bolt can make the board unstable.
| Bolt Location | Tightness Level |
|---|---|
| Front | Snug, not over-tight |
| Middle | Snug, check for alignment |
| Rear | Snug, ensure no movement |
Use the table as a guide for each bolt’s tightness level. This ensures a secure fit.
Double-checking Alignment
After tightening the bolts, it’s time to double-check the alignment. Proper alignment ensures your running boards are safe and look great. Here’s what to do:
- Stand back and look at the boards from the front and rear of the vehicle.
- Make sure the board is parallel to the vehicle’s body.
- Adjust if needed by loosening the bolts slightly, shifting the board, and retightening.
Key points to remember:
- Boards should not touch the vehicle’s body.
- Equal distance from the front and back of the board to the car’s body.
Re-check the bolts for tightness after any adjustments. This prevents rattling or shifting while driving.
A well-aligned running board not only looks better but also ensures a safer step for you and your passengers. Take your time and make sure it’s done right.
Final Adjustments
Installing Westin Running Boards on your vehicle adds both style and function. It’s crucial to make final adjustments once they’re in place. These tweaks ensure safety and comfort for all who step on them. Let’s dive into testing their stability and making any necessary corrections.
Test Stability
Before you hit the road with your new running boards, test their stability. This step is vital for safety and performance. Apply weight to each board and watch for any give or movement. Boards should remain firm and unyielding. Use these steps to check:
- Press down firmly at each end and the center of the running board.
- Feel for any shifting or creaking sounds.
- Observe if the board holds your weight without bending.
Repeat these steps several times to ensure consistent stability. If you detect any movement, take note of where it occurs. Is it at the mounting points, along the board’s length, or at the brackets? Your findings will guide you in the next steps.
Make Corrections
If you find any instability in your Westin Running Boards, it’s time to make corrections. Follow these steps to secure your boards:
- Locate the source of the instability.
- Tighten all bolts and brackets associated with the wobble.
- Ensure all mounting points are securely attached to the vehicle’s frame.
- Double-check the brackets for proper alignment.
After tightening, perform the stability test again. If issues persist, re-examine the installation manual. Confirm that all parts are correctly installed. You may need to adjust the brackets or replace any faulty hardware. Once adjustments are made, your running boards should be ready for use. Enjoy the added convenience and safety they provide!
Cleaning Up
After fitting your new Westin Running Boards, it’s time to clean up. A tidy workspace ensures safety and allows you to find tools easily for future projects. Proper disposal of packaging and storing tools correctly are key steps in this process. Let’s walk through these essential clean-up tasks.
Dispose Of Packaging
Dealing with packaging materials is crucial after installation. Here’s a step-by-step guide to do it right:
- Break down cardboard boxes into flat pieces for recycling.
- Separate plastic wrappers and foam padding.
- Check local recycling guidelines for disposing of materials properly.
- Ensure that all sharp objects like staples are safely removed.
Organizing waste helps the environment and keeps your space clear. Use the table below to sort different materials:
| Material | Action |
|---|---|
| Cardboard | Recycle |
| Plastic | Check if recyclable; if not, dispose of as waste |
| Metal | Recycle if possible |
| Foam | Reuse or throw away |
Store Tools Properly
Tools last longer when stored correctly. Follow these steps to keep them in good shape:
- Clean tools before storing. Wipe off any grease or dirt.
- Place each tool back in its designated spot, like a toolbox or shelf.
- Coat metal parts with a light oil to prevent rust.
- Store power tools in their cases, away from moisture.
Remember to charge batteries for cordless tools and keep them in a cool, dry place. Below is a checklist to ensure all tools are accounted for:
| Tool | Checked |
|---|---|
| Wrench | Yes |
| Screwdriver | Yes |
| Hammer | Yes |
| Drill | Yes |
| Ratchet Set | Yes |
Take care of your tools, and they will be ready for your next project. A clean and organized space is a safer one for you and your family.
Safety Tips
Installing Westin Running Boards on your vehicle offers convenience and style. But safety always comes first. Keep these tips in mind to ensure your running boards serve you well without any risks. Safety isn’t just a practice; it’s a necessity for protecting you and your passengers every time you step on those boards.
Weight Capacity
Every running board has a maximum weight it can handle. Ignoring this could lead to damage or injury. Always check the weight limit before you purchase and install your Westin Running Boards. Here’s what you need to consider:
- Check the product specifications for the weight capacity.
- Match the capacity with the average weight of users.
- Consider the added weight of items you might carry.
Remember, exceeding the weight limit can cause the running boards to bend or break. Use the table below as a quick reference for your Westin Running Boards’ weight capacity:
| Running Board Model | Weight Capacity |
|---|---|
| Westin Pro Traxx 4 | 300 lbs |
| Westin HDX | 350 lbs |
| Westin Sure-Grip | 250 lbs |
Stick to the limits to maintain the integrity of your running boards.
Regular Inspections
Continuous use can wear down even the sturdiest running boards. Perform regular inspections to spot issues early. This prevents accidents and costly repairs. Here’s a simple checklist for your inspections:
- Look for cracks or bends in the boards.
- Check for loose bolts or brackets that need tightening.
- Ensure the step pads are secure and not worn out.
- Watch for rust or corrosion, especially if you live in a snowy area where roads are salted.
Set a schedule to inspect your Westin Running Boards every few months. If you detect any damage, address it immediately. For example, if bolts need tightening, see the table below:
| Inspection Item | Action Required |
|---|---|
| Loose Bolts | Tighten to manufacturer’s specifications |
| Cracked Boards | Contact Westin for replacement options |
| Worn Step Pads | Replace pads to prevent slipping |
Regular care keeps your running boards safe and functional. Never ignore signs of wear and always address them promptly.
Conclusion
Installing Westin running boards can significantly enhance the functionality and aesthetics of your vehicle. By following the step-by-step installation process and ensuring a secure fit, you can enjoy the convenience and protection that running boards provide. Remember to carefully read the manufacturer’s instructions, test the stability of the running boards, and perform regular maintenance to keep them in optimal condition.
Read More: Fuel Injector Cleaning Without Removal: How to Clean Fuel Injectors
Frequently Asked Questions (FAQs)
1. Can I install Westin running boards myself?
Yes, the installation process for Westin running boards is designed to be DIY-friendly. However, if you are unsure or uncomfortable with the installation process, it is recommended to seek professional assistance.
2. Do Westin running boards require drilling into the vehicle?
The installation process for Westin running boards may require drilling into the vehicle’s frame or rocker panel in some cases. Follow the manufacturer’s instructions to determine if drilling is necessary for your specific vehicle model.
3. Can Westin running boards be installed on any vehicle?
Westin running boards are designed to be vehicle-specific, meaning they are engineered to fit particular makes and models. Ensure that you purchase the correct running boards that are compatible with your vehicle.
4. How long does the installation of Westin running boards take?
The installation time can vary depending on your level of experience and familiarity with the process. On average, the installation of Westin running boards may take a couple of hours.
5. Can Westin running boards be removed once installed?
Yes, Westin running boards can be removed if needed. However, it is important to note that the removal process may require unfastening the brackets and potentially leaving visible mounting holes on the vehicle’s frame or rocker panel.