
Last Updated on April 19, 2025 by Mark S. Taylor
Imagine this: you’re towing your trailer, and suddenly, the lights go out. No signals. No brake lights. Just you, hoping other drivers can read your mind. It’s happened to me too, and let me tell you—it’s not fun. That’s why knowing how to fix trailer lights is so important. Not only does it keep you safe, but it also keeps you legal. Over the years, I’ve tackled everything from bad grounds to blown fuses, and I’m here to share what I’ve learned. Whether you’re working with LED or incandescent lights, 4-pin or 7-pin systems, we’ll break it down step by step. By the end, you’ll feel confident fixing those lights yourself. Let’s dive in—you’ve got this.
Contents
Understanding Trailer Light Systems
Let’s start with the basics. Trailer light systems are like the backbone of your setup—they keep you safe and legal on the road. But when something goes wrong, it can feel like trying to solve a puzzle without all the pieces. I’ve been in that exact spot, staring at a tangle of wires, wondering where to begin. Trust me, once you understand how these systems work, fixing them becomes way less intimidating.
Types of Trailer Lights
Short Answer: LEDs are efficient and last longer, while incandescent bulbs are cheaper but burn out faster.
There are two main types of trailer lights: LED and incandescent. LEDs are like the marathon runners of lighting—bright, durable, and energy-efficient. They’re my go-to choice because they save power and rarely need replacing. Incandescent lights, on the other hand, are more like sprinters. They’re affordable upfront but fizzle out quickly. If you’re thinking about upgrading to LEDs, just be aware they might need resistors to work properly with older wiring. I made that switch last year, and it’s been smooth sailing ever since.
Now, let’s talk about setups. Most trailers use 4-pin, 5-pin, 6-pin, or 7-pin plugs. A 4-pin is perfect for basic functions like tail lights and turn signals. If you’ve got brakes or backup lights, you’ll need a 7-pin system. Think of it like choosing the right gear for the job—the right plug makes all the difference.
Wiring Color Codes
Short Answer: Standard colors include brown for tail lights, yellow for left signals, and green for right signals—but always confirm for your trailer.
Here’s where color comes into play. Trailer wiring uses a simple color code to keep things organized. Brown wires usually handle tail lights, yellow is for the left turn signal, and green is for the right. Ground wires are almost always white. Easy, right? Well, not always. I once spent an hour troubleshooting only to find out the “standard” codes didn’t apply to my trailer. Always check your manual or test wires with a multimeter if you’re unsure.
Visual Aid
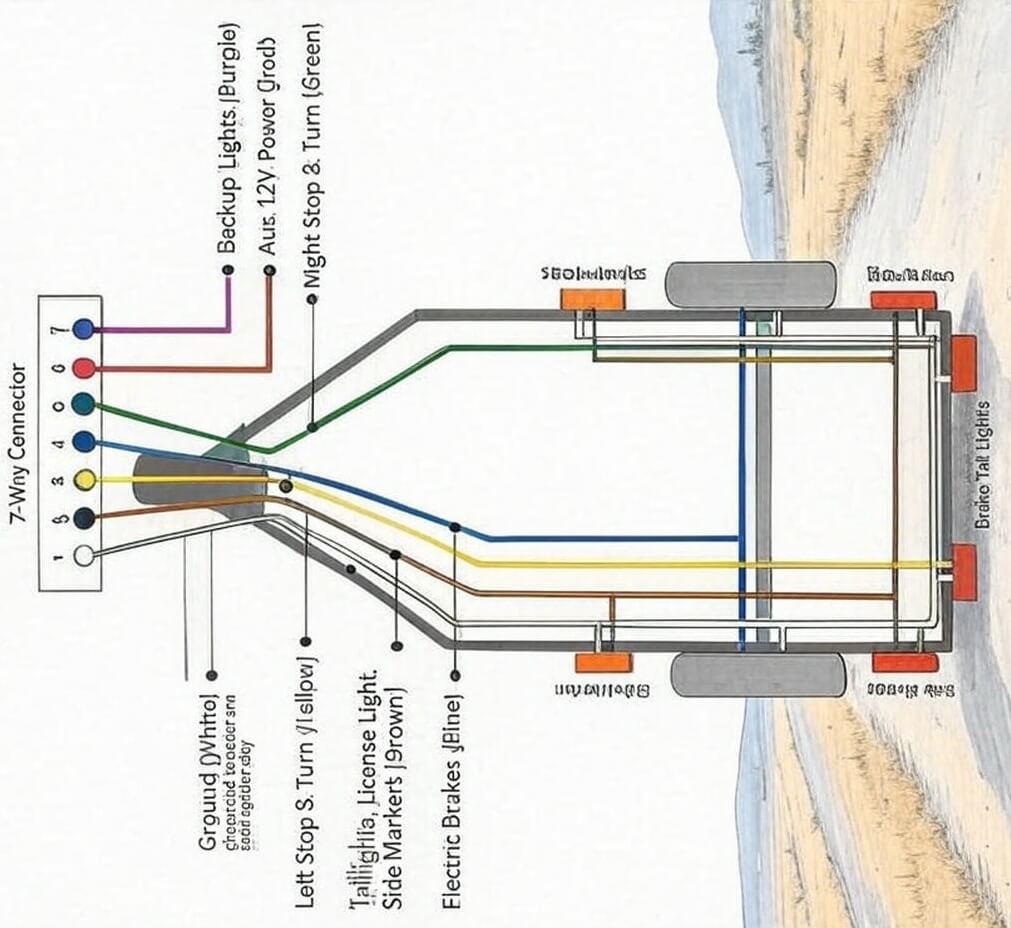
Short Answer: A wiring diagram helps you see exactly where each wire connects, saving time and frustration.
If you’re like me and visuals make things click, a wiring diagram is your best friend. Think of it as a cheat sheet for your trailer’s electrical system. I’ll include a simple one later to help you follow along. Having this map makes the whole process feel less overwhelming.
Understanding these basics gives you a solid foundation. Whether you’re dealing with LEDs or incandescents, 4-pin or 7-pin systems, you’re now ready to tackle the next steps. Take a deep breath—you’re already ahead of the game.
Safety First: Precautions Before Starting
Let’s talk about safety. I’ll admit, I’ve been guilty of skipping a step or two in the past when fixing trailer lights—only to regret it later. Electrical systems can be tricky, and taking shortcuts is a recipe for trouble. That’s why I always start with the basics now. Trust me, a little prep goes a long way in keeping you safe and making the job smoother.
Disconnect Power
Short Answer: Always disconnect the trailer from the vehicle’s electrical system before starting any work.
First things first—always disconnect the trailer from your vehicle’s power source. Think of it like turning off the water before fixing a leaky pipe. One time, I skipped this step and got a nasty shock (literally). Lesson learned. To avoid surprises, unplug the wiring harness and make sure the trailer isn’t connected to the tow vehicle. It’s a small step that makes a huge difference.
Use Proper Tools
Short Answer: Use tools like a multimeter, wire strippers, and electrical tape to work safely and effectively.
Having the right tools is like bringing the right gear on a camping trip—it makes everything easier. A multimeter is your best friend for testing wires, while wire strippers and electrical tape help you make clean, secure connections. I once tried to strip wires with a pocket knife (don’t ask), and let’s just say it didn’t end well. Now, I keep my toolkit ready so I’m prepared for anything.
Safety Gear
Short Answer: Protect yourself by wearing gloves and eye protection when handling wires.
Here’s the deal: wires can be sharp, and electrical systems can spark. Protect yourself by wearing gloves and safety glasses. I used to think gloves were overkill until I nicked my finger on a frayed wire. Ouch. Now, I never skip the gear—it’s a small step that keeps me safe and focused on the task at hand.
Grounding Issues
Short Answer: A bad ground connection is one of the most common causes of trailer light problems.
If there’s one thing I’ve learned, it’s that grounding issues are sneaky troublemakers. A bad ground can cause flickering lights, weird signals, or even total failure. Picture it like trying to build a house without a solid foundation—it just won’t work. Always check the ground connection first. Clean any corrosion, tighten loose bolts, or add a new ground wire if needed. I once spent hours troubleshooting only to find the problem was a loose ground screw. Don’t let that happen to you.
By following these precautions, you’re setting yourself up for success—and staying safe while you do it. Take a minute to prep, and you’ll save yourself hours of frustration later.
Step-by-Step Guide to Troubleshooting Trailer Lights
Fixing trailer lights can feel like solving a mystery, but don’t worry—I’m here to guide you through it. I’ve been in the trenches with flickering lights, dead circuits, and mysterious grounding issues. Let’s break it down step by step so you can tackle the problem with confidence. By the end of this, you’ll know exactly how to fix trailer lights like a pro.
Step 1: Inspect for Obvious Issues
Short Answer: Start by checking for broken bulbs, loose connections, or damaged wires—they’re often the easiest fixes.
Before diving into anything technical, take a good look at your setup. Are any bulbs burnt out? Are wires frayed or connectors corroded? One time, I spent an hour troubleshooting only to realize a bulb had simply popped out of its socket. Facepalm moment. Use a flashlight to inspect everything closely. Look for greenish corrosion on terminals—it’s a common culprit. If you spot anything suspicious, clean it up or replace it right away.
Step 2: Test the Trailer Lights
Short Answer: Use a trailer light tester or multimeter to check if the lights are getting power.
Now it’s time to test the system. If you don’t have your tow vehicle handy, grab a trailer light tester—it’s a lifesaver. Plug it in to see which lights work and which don’t. For a deeper dive, use a multimeter to check voltage at the plug and lights. I remember the first time I used a multimeter—it felt intimidating, but it’s actually pretty straightforward. Set it to DC voltage, touch the probes to the terminals, and you’ll know instantly if power is flowing.
Step 3: Check the Wiring Harness
Short Answer: Look for frayed wires, melted connectors, or corrosion, and replace the wiring harness if needed.
The wiring harness is like the nervous system of your trailer—when it’s damaged, nothing works right. Inspect the wires for cracks, burns, or exposed copper. Melted connectors? That’s a red flag for overheating. Once, I found a mouse nest tucked inside my trailer’s wiring harness. Lesson learned: always check thoroughly. If the damage is beyond repair, replacing the harness might seem daunting, but it’s easier than you think. Just match the old one to the new and reconnect each wire carefully.
Step 4: Diagnose Ground Problems
Short Answer: Flickering lights or partial functionality often point to a bad ground connection.
Grounding issues are sneaky troublemakers. If your lights flicker, work intermittently, or behave strangely, it’s likely a grounding problem. Think of it like trying to build a campfire without kindling—it just won’t catch. Clean the ground connection with sandpaper or a wire brush to remove rust or dirt. If that doesn’t help, add a new ground wire. I once fixed a stubborn issue by simply tightening a loose ground screw. Sometimes, it’s the little things.
Step 5: Test Each Circuit
Short Answer: Test tail lights, brake lights, turn signals, and reverse lights individually to pinpoint the issue.
Now it’s time to get specific. Test each circuit one by one—tail lights, brake lights, turn signals, and reverse lights. A troubleshooting chart can help you keep track of what works and what doesn’t. I like to write everything down so I don’t lose track. For example, if the left turn signal isn’t working but the right one is, focus on that side. Isolate the problem, and you’ll save yourself hours of frustration.
Step 6: Replace Faulty Components
Short Answer: Swap out burnt-out bulbs or upgrade to LED lights for better performance.
Finally, replace any faulty parts. Swapping a bulb is simple—just twist it out and pop in a new one. If you’re upgrading to LEDs, make sure they’re compatible with your system. I upgraded mine last year, and it made a world of difference. Pro tip: when soldering or crimping new wires, use heat-shrink tubing for a secure, weatherproof connection. It’s like giving your trailer lights a cozy raincoat.
By following these steps, you’ll have your trailer lights working in no time. Remember, patience is key—take it one step at a time, and you’ll get there.
LED vs. Incandescent Trailer Lights: Why I Made the Switch (and You Might Want To, Too)
So, let me tell you about my experience switching from incandescent trailer lights to LEDs—because if you’re on the fence, this might just help you decide. Picture this: it’s a dark, rainy night, and one of your trailer lights goes out mid-drive. That was me a few years ago, stuck on the side of the road with soggy hands and a flashlight, trying to figure out why my old incandescent bulbs kept burning out. It felt like they were giving up faster than my patience! Spoiler alert: LED lights solved that problem for good.
Now, here’s the short answer if you’re in a hurry: LED lights last longer, shine brighter, and save energy compared to incandescent ones—but they can be finicky with wiring issues like polarity. If you’ve ever dealt with flickering or dead incandescent bulbs, upgrading to LEDs is worth considering.
When I finally made the switch, I noticed some big benefits right away. First off, no more constant replacements! LEDs are built to last years , not months. Plus, their brightness? Game-changing. Think of them as the difference between candlelight and sunlight—they make your trailer visible even in heavy fog or rain. And because they use less power, my vehicle’s battery didn’t have to work as hard either. Honestly, once you go LED, there’s no going back.
Here’s a quick tip if you’re thinking about upgrading: Check your trailer’s wiring before installing LEDs. They’re sensitive to polarity, which means they won’t work properly if the wires aren’t connected correctly. Trust me—I learned this the hard way when half my lights refused to turn on at first. A simple multimeter test helped me sort things out. Also, invest in quality LED kits designed specifically for trailers; cheaper options may not hold up well over time.
Switching to LED lights felt like trading an old clunker for a shiny new car—it just worked better. Sure, the upfront cost was higher, but the long-term savings and peace of mind? Totally worth it. So, if you’re tired of replacing bulbs every other month, maybe it’s time to give LEDs a shot. Your future self will thank you!
Final takeaway: LEDs are brighter, last longer, and save energy, but double-check your wiring to avoid headaches during installation.
How to Replace a Trailer Wiring Harness: A Friend’s Guide to Getting It Right
Let me start by saying this: replacing a trailer wiring harness doesn’t have to feel like solving a Rubik’s Cube blindfolded. I’ve been there—staring at a tangled mess of wires, wondering if I’d bitten off more than I could chew. Spoiler alert: it’s totally doable, even for someone who isn’t a wiring wizard. Here’s the short answer if you’re in a rush: Disconnect the old harness, route the new one along the trailer frame, connect wires by color code, secure everything with zip ties, and test all circuits before hitting the road. Easy, right? Let me walk you through it step by step.
First things first, disconnect the old harness from the trailer. This part feels like untying knots in your headphones—tedious but necessary. Take your time to label or snap pictures of the connections if you’re worried about forgetting where things go. Trust me, future-you will appreciate the help. Once the old harness is out, grab the new one and start routing it along the trailer frame. Think of it like threading a needle through fabric—you want it snug but not too tight, avoiding sharp edges that could damage the wires.
Now comes the fun part: connecting the wires according to their color codes. This is where most people trip up, so pay close attention. Red usually goes to power, white to ground, brown to running lights—you get the idea. If the colors don’t match perfectly (and sometimes they don’t), double-check with a wiring diagram. One common mistake? Loose connections. Make sure every wire is securely attached, or you’ll end up with flickering lights—or worse, none at all. Another pitfall? Exposed wires. Always use electrical tape or heat shrink tubing to protect them from moisture and corrosion.
Once everything’s connected, secure the harness with zip ties to keep it tidy and prevent it from dangling. Then, it’s testing time. Turn on your vehicle’s lights, hit the brakes, and check all functions. If something doesn’t work, don’t panic—it’s probably just a loose connection or a crossed wire. I once spent an hour troubleshooting only to realize I’d accidentally swapped two wires. Lesson learned: patience pays off.
Here’s the takeaway: Replacing a trailer wiring harness is straightforward if you follow the steps carefully and avoid common mistakes like loose connections or exposed wires. With a little effort, you’ll have a reliable setup that keeps your trailer visible and safe on the road. And hey, if I can do it, so can you!
Special Cases and Advanced Troubleshooting: Tackling the Tricky Stuff with Confidence
Let’s talk about some tougher trailer light problems. Ever had your 7-pin system go haywire? Or those LED lights just refuse to work? Don’t worry—it happens to the best of us. Here’s the quick fix: For 7-pin systems, check brake controllers and auxiliary circuits. For LEDs, fix polarity issues or add resistors if needed. A multimeter is your best friend for testing. Now, let’s break it down.
If your 7-pin trailer lights aren’t working , start with the auxiliary circuits. Brake controllers are often the troublemakers here. I once spent hours troubleshooting only to find my brake controller wasn’t set up right. It felt like driving without brakes—scary! First, check all connections. Then, test the brake controller. If backup lights are out, inspect the wiring for breaks or rust. Think of these circuits as team players—they’re small but mighty.
Switching to LED trailer lights feels like upgrading to a shiny new phone. Brighter, better, but sometimes tricky. One common issue? Polarity. LEDs need current to flow the right way. If they don’t light up, flip the wires. Another snag? Older vehicles may not play nice with LEDs. Adding resistors fixes this. Don’t worry—it’s easier than it sounds. Just wire them in parallel with the lights. I did this myself, and it worked like a charm.
Not sure where the problem is? Grab a multimeter. It’s like giving your trailer a check-up. First, test for continuity. This checks if the wires are intact. Next, check the voltage at each connection. If the numbers seem off, you’ve found the issue. I remember using a multimeter for the first time. Watching those digits pop up felt like unlocking a secret code.
Here’s the bottom line: Advanced troubleshooting isn’t hard if you take it step by step. Fix one thing at a time. Whether it’s 7-pin systems, LEDs, or testing circuits, patience pays off. And guess what? Every expert starts as a beginner. You’ll get the hang of it—I promise!
Tools and Resources for Trailer Light Repair: What You Need and Where to Find It
Fixing trailer lights doesn’t have to be stressful. Whether you’re a DIY pro or just trying to get the job done, having the right tools and resources makes all the difference. Quick answer: Use diagnostic tools like testers and multimeters, keep spare parts on hand, and know where to find professional help if needed. Let’s break it down step by step.
Diagnostic tools are your best friends. A trailer light tester checks connections fast—it’s like a quick health check for your lights. Multimeters help measure voltage and continuity. Think of them as a flashlight that shows hidden problems. Circuit testers? They’re like lie detectors. They’ll spot shorts or faulty wires. I always keep a multimeter in my toolbox. It’s saved me more times than I can count.
What about replacement parts ? Knowing where to buy quality bulbs, wiring harnesses, and connectors is key. I shop online (Amazon or specialty stores) or visit local auto shops. Pro tip: Buy extras. Trust me, running out of connectors mid-repair is no fun. I once drove 20 miles for wire nuts. Lesson learned! Look for kits with everything you need—it’s like grabbing a ready-made meal instead of cooking from scratch.
If DIY feels overwhelming, don’t hesitate to call in the pros. Search for “trailer light repair near me” to find help. Sometimes, it’s worth letting experts handle complex jobs like rewiring. Check reviews and ask for recommendations. Think of it as calling a plumber when the sink won’t stop leaking—it’s okay to ask for backup!
Here’s the bottom line: The right tools, spare parts, and access to pros make repairs easier. With these resources, you’ll feel confident tackling issues—or knowing when to call for help. Every tool you add is like adding another friend to your team.
Preventative Maintenance Tips: Keep Your Trailer Lights in Top Shape
Let’s talk about keeping your trailer lights running smoothly. Trust me, a little TLC goes a long way in avoiding those frustrating breakdowns on the road. Here’s the quick answer: Regularly clean connectors, check ground wires, store your trailer properly, and test lights before trips. Using quality parts is key, too. Now, let’s dive into how you can make this happen without breaking a sweat.
First up, clean your connectors regularly with dielectric grease. Think of connectors as the handshake between your trailer and vehicle—they need to stay strong and smooth. I’ve learned the hard way that dirt and rust can ruin that connection. A quick wipe-down and a dab of dielectric grease keep things working like new. It’s like moisturizing your hands in winter—simple but effective.
Next, always check your ground connections before long trips. Ground wires are like the foundation of a house—if they’re weak, everything else falls apart. I once had a light issue that turned out to be a loose ground wire. After tightening it, my lights worked perfectly. Lesson learned: Never skip this step before hitting the road.
Another big one? Store your trailer in dry conditions to prevent corrosion. Moisture is the enemy of metal—it’s like leaving your bike out in the rain and finding it rusty the next day. If you don’t have a garage, use a tarp or cover to shield your trailer. Keeping it dry saves you from headaches later.
Finally, test your lights before every trip. It’s like checking your phone battery before leaving the house—you don’t want to get stuck. Turn on each light and confirm it’s working. Catching issues early means less stress down the road. Oh, and always use quality replacement parts. Cheap ones might save money upfront, but they’ll cost you more in repairs later. I’ve been there, and trust me, it’s not worth it.
Here’s the takeaway: Preventative maintenance is all about small, consistent actions. Clean connectors, check grounds, store properly, and test lights regularly. With these habits, you’ll avoid most problems and enjoy smoother rides. And hey, taking care of your trailer is like taking care of an old friend—it deserves the best!
FAQs: Your Go-To Answers for Trailer Light Questions
Got questions about trailer lights? You’re not alone. Here’s a quick, easy-to-read list of answers to the most common queries. Whether you’re troubleshooting or planning ahead, these tips will keep you in the know.
Q: How do I test trailer lights without a vehicle?
A: Use a 12V battery or a trailer light tester. Hook up the wires to see if the lights work. It’s like giving your trailer a quick power boost!
Q: Why do my trailer lights work intermittently?
A: Likely a ground issue or loose connection. Check the ground wire and tighten any loose connections. Think of it as fixing a wobbly table leg—it just needs stability.
Q: Can I use LED bulbs in incandescent fixtures?
A: Yes, but check polarity and compatibility first. LEDs are sensitive to how current flows, so reverse the wires if needed. It’s like swapping out old shoes for new ones—they might need a little adjustment.
Q: What’s the difference between 4-pin and 7-pin wiring?
A: A 4-pin system handles basic lights, while a 7-pin includes brakes and auxiliary power. Think of it as upgrading from a basic phone to a smartphone—more features, more options.
Q: How do I fix a trailer light ground problem?
A: Clean and re-secure the ground wire to a clean metal surface. Rust or dirt can block the connection. It’s like clearing mud off your boots before stepping inside.
Q: Where can I find a trailer light wiring diagram?
A: Refer to the diagram in this article or search online for “trailer light wiring diagram.” It’s like having a map for your electrical journey—don’t leave home without it!
My Final Thoughts on Fixing Trailer Lights
If you’re a DIY enthusiast who loves a hands-on challenge, fixing trailer lights is totally doable and rewarding! But if wiring makes you nervous, a pro might be your best bet for tricky issues. I’ll never forget the relief I felt when I fixed my trailer’s bad ground on a rainy night—lights back on, safe and sound! Keep your trailer lights working for safety, and don’t be afraid to try simple repairs yourself.